Imagine it’s a crisp Saturday morning, and you’re craving that perfect cup of pour-over coffee to kickstart your day. You’ve got your freshly ground beans ready, but there’s one essential piece of equipment that can elevate your brewing game: a gooseneck kettle. With its precision spout and control over water flow, you can create a brew that’s bursting with flavour. Let’s dive into what makes a gooseneck kettle the ideal companion for your coffee ritual and how to find the right one for your kitchen.
In This Article
- Why a Gooseneck Kettle Makes a Difference
- Electric vs Stovetop: Which to Choose
- Temperature Control: Do You Need It?
- Flow Rate: Why It Matters More Than You Think
- Capacity and Size
- Materials and Build Quality
- Best Gooseneck Kettles by Budget
- How to Use a Gooseneck Kettle Properly
- Common Mistakes When Buying
- Frequently Asked Questions
Why a Gooseneck Kettle Makes a Difference
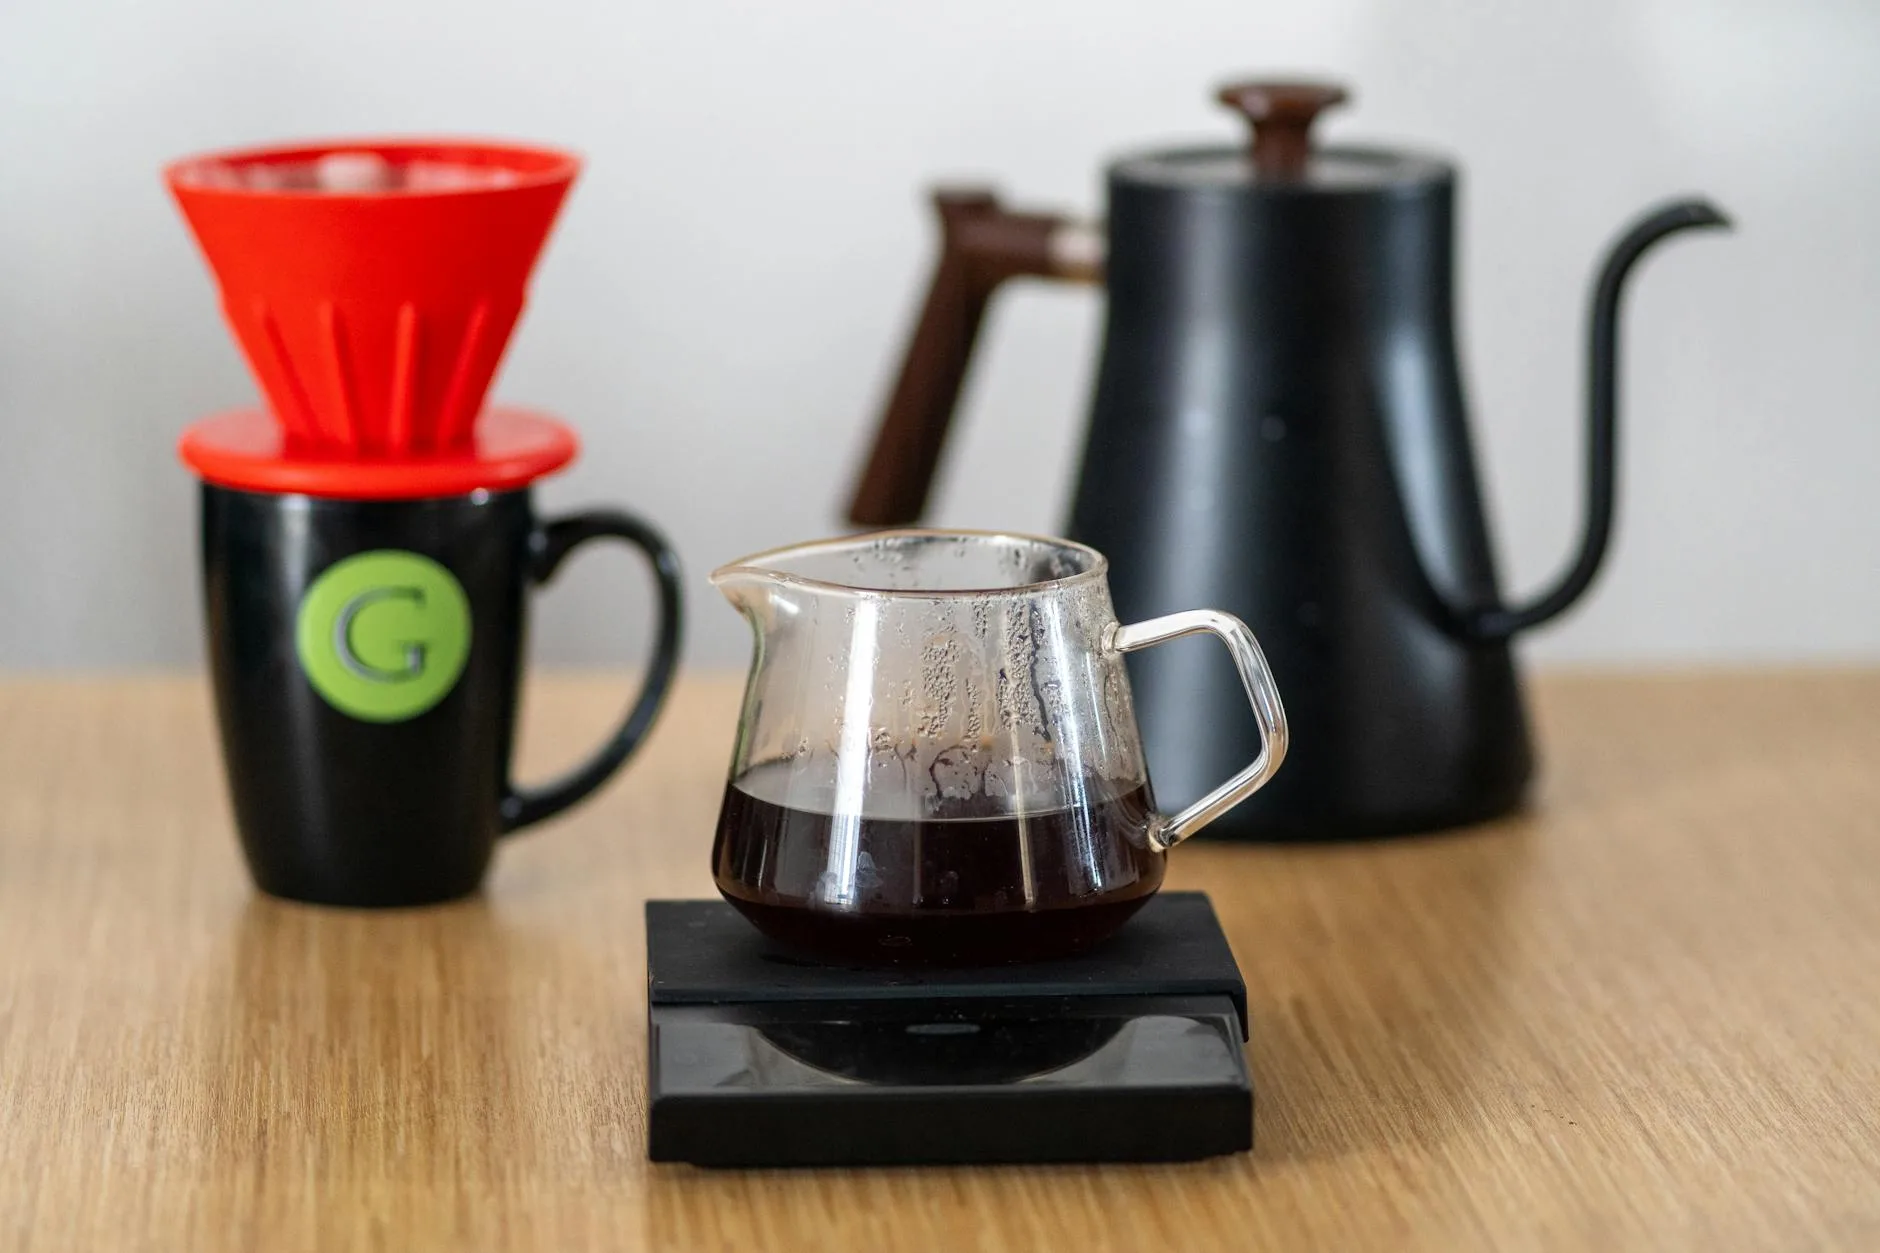
You’re pouring water from a standard kettle into your V60. The stream comes out thick and uncontrolled, hits the coffee bed like a fire hose, and blasts grounds up the sides of the filter. Half your coffee is over-extracted at the bottom, half is barely touched on the walls, and the cup tastes like a confused compromise between weak and bitter.
A gooseneck kettle fixes this with one simple design change: a thin, curved spout that gives you precise control over where the water goes and how fast it flows. The difference in the cup is immediate and obvious. I switched from pouring out of a standard Russell Hobbs to a £35 Hario gooseneck, and the improvement in my pour-overs was the biggest single upgrade I’ve made — more than the grinder, more than the beans.
What Makes It “Gooseneck”
The spout is thin, long, and curves like a goose’s neck. This shape creates two effects:
- Restricted flow — the narrow opening means water comes out slower and thinner than a standard kettle, regardless of how much you tilt
- Precision control — the length of the spout acts as a lever, giving you fine control over position and pour speed. Small wrist movements translate to precise water placement
The result: you can pour in slow, controlled circles, evenly saturating the coffee bed without disturbing it. This even extraction is what makes pour-over coffee taste clean, clear, and complex rather than muddled.
Electric vs Stovetop: Which to Choose
Electric Gooseneck Kettles
Plug in, set temperature, wait, pour. The most convenient option and the market leader in the UK.
- Price range: £40-150
- Advantages: temperature control (on most models), automatic shut-off, keep-warm functions, faster heating, no hob required
- Disadvantages: needs counter space, another electrical appliance, can’t take camping
- Best for: daily home brewers who value convenience and temperature precision
Stovetop Gooseneck Kettles
A simple kettle with a gooseneck spout that sits on your hob. No electronics, no settings.
- Price range: £25-70
- Advantages: simple, durable, no electronics to fail, works with any heat source including camping stoves, often lighter
- Disadvantages: no temperature control (unless you use a separate thermometer), need to watch it, slower on electric hobs
- Best for: minimalists, campers, people who already have a thermometer, and anyone who doesn’t want another plug socket occupied
My Recommendation
If you’re making pour-over daily and want the best results with least effort, go electric with temperature control. If you’re just starting out or only brew pour-over occasionally, a stovetop is cheaper and works fine with a £5 clip-on thermometer. If you are exploring this area, our guide on Chemex vs V60 vs Kalita Wave: Pour-Over Methods Compared covers the essentials.
I used a stovetop Hario for a year before upgrading to a Brewista electric. The stovetop made great coffee. The electric just made the process slightly more convenient — set and forget while you grind.
Temperature Control: Do You Need It?
Why Temperature Matters
Coffee extracts differently at different temperatures. The Specialty Coffee Association (SCA) recommends brewing between 92-96°C for most pour-over methods. Too hot and you get harsh, bitter over-extraction. Too cool and you get sour, underdeveloped flavours.
What Temperature Control Gives You
- Set exact temperature — dial in 93°C for medium roasts, 88-90°C for dark roasts, 95°C for light roasts
- Consistency — same temperature every morning means same extraction every morning
- Hold function — keeps water at temperature for 30-60 minutes. Useful if you’re making multiple cups or get distracted
Do You Actually Need It?
For most people: it’s nice but not essential. Water straight off the boil (100°C) cools to about 93-94°C within 30-60 seconds of pouring from a boiling kettle. If you boil, wait 30 seconds, then pour — you’re in the right ballpark. Temperature control matters most when you’re dialling in specific recipes or brewing very light roasts that need precision. You might also find our Dual Boiler vs Heat Exchanger: Coffee Machine Types Explained guide useful here.
If you’re spending over £60 on an electric kettle anyway, get one with temperature control. At that price point it’s standard. Below £60, you’re choosing between basic electric or stovetop — and a stovetop plus a £5 thermometer does the same job.
Flow Rate: Why It Matters More Than You Think
The Physics of Pouring
Flow rate is determined by spout diameter, spout shape, and how much you tilt. The ideal pour-over flow rate is about 3-4ml per second — a thin, steady stream. Too fast and you flood the bed. Too slow and you’re standing there for five minutes making a single cup.
What Affects Flow Rate
- Spout diameter — thinner = slower, more controlled. Most quality goosenecks have a 6-9mm internal diameter at the tip
- Spout shape — a gradual taper gives more control than an abrupt narrowing. The best kettles have a smooth, consistent internal taper
- Spout angle — affects minimum pour speed. Some kettles drip at low angles; others need more tilt to start flowing. Drip resistance is annoying for slow pours
Testing Flow Rate
Before buying, look for reviews that mention pouring behaviour. The best kettles let you pour at a very thin stream without dripping, and thicken smoothly as you tilt further. Cheap kettles tend to go from nothing to flood with very little in between. We cover this in more detail in our Best Espresso Machines Under £500: UK Home Barista Guide piece.
I’ve found that the Hario Buono and Brewista Artisan have the best flow control of the kettles I’ve used — you can pour at a whisper-thin trickle or open it up for the bloom without any awkward dead zone.
Capacity and Size
How Much Water Do You Need?
- Single cup (250ml brew) — you need about 300-350ml in the kettle (extra for pre-wetting the filter and warming the cup)
- Two cups — about 600-700ml
- Three cups or Chemex — 800-1000ml
Kettle Sizes Available
- 0.6-0.8 litre — compact, light, heats fast. Perfect for single-cup brewing. Most Japanese-style stovetop kettles are this size
- 0.9-1.0 litre — the versatile middle ground. Handles 1-3 cups comfortably. Most popular size in the UK
- 1.2 litre — the largest common size. Good if you brew large batches or use a Chemex. Heavier when full
Don’t Buy Too Big
A full 1.2-litre gooseneck weighs about 1.5-1.8kg. Holding that at arm’s length while doing a slow, controlled pour for 3-4 minutes tires your wrist. For daily single-cup brewing, a 0.8L kettle is lighter and easier to control. I bought a 1L when I should have bought a 0.8L — the extra weight is noticeable during long pours.
Materials and Build Quality
Stainless Steel (Most Common)
The standard material. Durable, easy to clean, doesn’t affect flavour. Look for 304-grade stainless steel — it’s food-safe and corrosion-resistant. Most kettles from Hario, Fellow, and Brewista use this. For related advice, take a look at Best Speciality Coffee Beans 2026 UK: Light & Medium Roasts.
Copper
Beautiful and heats extremely evenly, but requires more maintenance (tarnishes without polishing) and is heavier. Mainly available on premium Japanese stovetop models (Kalita, Takahiro). Expect to pay £80-150 for copper.
Build Quality Indicators
- Handle comfort — you’re holding this for 3-4 minutes per brew. A comfortable, heat-insulated handle matters. Avoid thin metal handles with no insulation
- Lid fit — loose lids rattle and can fall off when pouring. Good kettles have snug lids or steam-release vents
- Base stability — the kettle should sit flat without wobbling. Electric bases should have non-slip feet
- Spout weld quality — look at where the spout meets the body. Visible gaps or rough welds suggest poor manufacturing
Best Gooseneck Kettles by Budget
Under £40
- Hario V60 Drip Kettle Buono (stovetop) — about £30-35. The classic. 1.2L, stainless steel, excellent flow control. I started with this and still use it for camping. Available from Bella Barista or Amazon UK
£40-80
- Brewista Smart Pour 2 (electric) — about £65-75. 1.2L, variable temperature (60-100°C), 60-minute hold. The best value electric gooseneck in the UK right now
- Fellow Stagg EKG (stovetop version) — about £60-70. Beautiful design, counterbalanced handle, built-in thermometer. Looks and pours brilliantly
£80-150
- Fellow Stagg EKG (electric) — about £130-150. The gold standard for home pour-over. Precise temperature control, stunning design, excellent flow. If budget allows, this is the one to buy
- Brewista Artisan (electric) — about £100-120. 0.6L, extremely precise flow control, PID temperature. Popular with competition baristas
The One to Buy
For most people starting pour-over: the Brewista Smart Pour 2 at about £65-75. It has temperature control, hold function, good capacity, and decent flow control at a price that doesn’t sting. If you’re already committed to pour-over and want the best daily experience: the Fellow Stagg EKG electric at about £130-150 — it’s a joy to use every morning.
How to Use a Gooseneck Kettle Properly
The Bloom Pour
Start by wetting all the grounds with about twice their weight in water (30g coffee = 60ml water for the bloom). Pour in slow, concentric circles from the centre outward. Wait 30-45 seconds for the CO2 to release — you’ll see bubbling and the bed rising. This degassing step prevents channelling in the main pour. According to Which? consumer reviews, this is worth keeping in mind.
The Main Pour
After the bloom, pour in steady concentric circles, keeping the stream about 1cm from the edges of the filter. Maintain a consistent height — about 3-5cm above the coffee bed. The kettle’s gooseneck makes this easy because small wrist movements translate to precise positioning.
Speed Control
Tilt gradually. The beauty of a gooseneck is that you can go from zero flow to full flow with fine adjustments. Find a tilt angle that gives you a thin, steady stream and hold it. If you’re pulsing (multiple pours with pauses between), stop pouring by levelling the kettle rather than lifting it — this prevents drips.
Maintenance
- Descale monthly if you’re in a hard water area (most of southern England). Use citric acid or a commercial descaler
- Don’t leave water sitting in the kettle between uses — mineral deposits build up
- Wipe the exterior after each use if you have a stainless steel kettle — water spots are visible on polished steel
Common Mistakes When Buying
Choosing Based on Looks Alone
The Fellow Stagg is beautiful. But if you only make pour-over once a week and mainly drink espresso, you don’t need a £130 gooseneck kettle. Match the kettle to your brewing frequency.
Ignoring Capacity
A 0.6L kettle looks sleek on the shelf but won’t make a full Chemex without refilling and reheating. Think about what you actually brew and how much before choosing.
Forgetting About Storage
Electric gooseneck kettles need counter space — they’re not the kind of thing you unplug and put in a cupboard after each use. If counter space is limited, a stovetop model stores more easily.
Buying the Cheapest Amazon Option
Unbranded £20 gooseneck kettles from random Amazon sellers often have terrible flow control (the most important feature). The spout manufacturing is where cheap kettles cut corners, and it’s the one thing you can’t fix. Spend at least £30 on a recognised brand.
Frequently Asked Questions
Can I use a gooseneck kettle for regular tea? Yes, but it’s slower than a standard kettle. The restricted spout means filling a mug takes longer. Most people who own a gooseneck keep their regular kettle for tea and use the gooseneck specifically for coffee brewing. There’s no technical reason you can’t use it for tea — it’s just less practical for large volumes.
Is a gooseneck kettle worth it for AeroPress? Less critical than for pour-over. AeroPress is forgiving about pour precision because you’re immersing the grounds rather than percolating through them. A gooseneck makes the AeroPress bloom easier and gives more control during the initial pour, but it’s not the same night-and-day difference as with a V60. If pour-over is your main method, buy one. If AeroPress is all you do, it’s a nice-to-have.
How hot should water be for pour-over coffee? Between 92-96°C for most coffees. Light roasts extract better at 94-96°C. Medium roasts at 92-94°C. Dark roasts at 88-92°C. If you don’t have temperature control, boil the kettle and wait 30-60 seconds — this brings water to roughly 93-94°C, which works for most situations.
Do I need a built-in thermometer? If you’re using a stovetop gooseneck, a built-in or clip-on thermometer is useful for hitting your target temperature. For electric kettles with temperature control, it’s redundant — the digital display tells you the temperature. A separate £5 clip-on thermometer from Amazon works just as well as a built-in one.
What size gooseneck kettle should I buy? For single cups, 0.6-0.8L is ideal — light and easy to control. For 2-3 cups or Chemex brewing, 0.9-1.0L gives enough capacity without excess weight. Don’t buy 1.2L unless you regularly brew large batches — the extra weight makes precision pouring harder over long brew times.